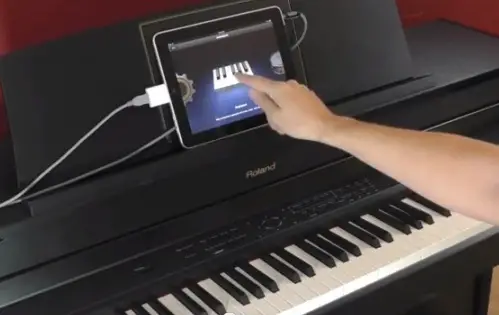
How to connect a musical/midi piano keyboard to the computer or iOS device (iPad, iPhone) so that you can work with various music software, including recording software such as Cubase, Reason, FL Studio. You can also easily download or transfer midi song files between your PC/Mac and your music keyboard. You can connect your piano keyboard to PC via USB and iPad with the Apple USB Camera Connection Kit with no issues whatsoever.
Why Connect a Piano Keyboard to a Computer/Laptop?
Its easy to connect your digital keyboard or digital piano piano to any iOS device (such as iPhone or iPad) for more creative possibilities. You can get much more out of your keyboard.
Once your keyboard is connected to the iOS device, here are some of the things you could do:
- Work with various recording software
- Work with music instructional software, learn music using music learning software
- Learn to play songs using midi files: On the other hand, if you are keen to learn to play one of your favorite songs, just download the midi file for that song from the internet and then onto your Yamaha electronic keyboard. And you are ready to use that song.
- Record your performances on the computer or iOS device
- Create music on your iOS device by using the keyboard as a keyboard controller
- Work with music notation software
- Take backups of your music: Have you been recording your own songs on your Yamaha keyboard? It would be a good idea to store them on the computer if you have several of them.
- and more…
It’s convenient from a storage perspective and it’s to distribute it if need be.
Download additional sounds and styles
Various Methods to Connect a MIDI Keyboard to a Computer
Before you can try out either of the above listed options, you should first connect your MIDI keyboard (be it Yamaha, Casio, Roland or any other brand) to the computer.
Keyboards have evolved over the years (several new types of ports have sprung up), and based on that the method of connection varies. The USB to USB is the easiest and the most common (found in most recent keyboards)
Lets take a look at the various ways to connect a digital music keyboard to a computer (or a laptop).
USB to USB (via Standard USB Cable)
Most latest keyboard models come with a USB MIDI port, in which case all you need is a standard USB cable (connect’s directly from the keyboard’s USB to the USB port of your PC or laptop.
To connect your midi keyboard to a computer, you will need a standard USB cable. However, to connect it to your ipad (iOS device), you will need an Apple camera connection kit. How to connect a digital piano keyboard to iOS Device (iPad, iPhone)
MIDI to USB Interfaces
This is the easiest way to connect to a computer (especially laptop), assuming the computer has a USB port.
These USB interfaces are usually Plug-and-Play, so no further software configurations are required (certain software may require you to download drivers, readily available from the manufacturers website).

Checkout more midi keyboard controllers here…
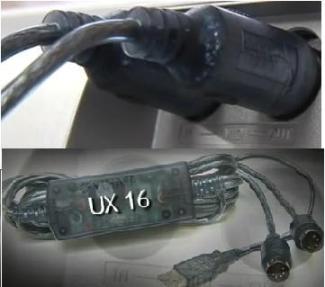
USB-to-Midi cables (or midi interface) are available to make the connection between computers and midi keyboards. By using an optional accessory like a midi cable to make the midi connection, you can make your music keyboard communicate with your PC.
Midi to Midi (via MIDI Cable)
Most older keyboards and Digital Pianos (and the pro ones) have MIDI in and out ports. If your keyboard has midi ports (but no USB), buy a soundcard (audio interface). There are some soundcards that come equipped with MIDI ports. You will need to buy a MIDI Cable separately.
While making the connection, make sure the cables are connected from IN to OUT, and from OUT to IN.
Buying Various Cables & Interfaces
Most users also buy a Midi to USB cable (or the appropriate cable) when they buy a new digital piano or keyboard, so that they can work with their laptop / computer.
In general, MIDI and audio interfaces from reputed brands offer more features and better speeds (low latency). Brands like Roland, Alesis and M-Audio have great products with excellent documentation and support features.
How to Connect a Digital Piano Keyboard to iOS Device (iPad, iPhone)
So how to connect a digital keyboard to an iOS device like iPhone / iPad? Here are a couple of ways to do it:
- Connect the digital piano/keyboard to the iOS device vioa the keyboard’s USB To Host terminal using Apple Lightning to USB Camera Adapter Model MD821ZM/A
- Connect the digital piano/keyboard wirelessly to the iOS device using a wireless USB to Host MIDI Adapter (such as UD-BT01)
Once the connection is done, you can use several useful music apps for easy operation and added performance and functionality.
Do you need an amplifier to hear the sound?
It depends on what sort of setup you are looking at.
Once the digital piano keyboard is connected to the computer properly, and the DAW software recognizes it, ideally you should be able to hear the sound from the computer. If you are doing just to see how the connection works, you could use the computer speakers or even use some good headphones. But if you want to do some serious music work, you need to get good pair of speakers (monitors).
Videos that Demonstrate How to Connect and Check the MIDI Connection
Most first-timers face this problem where the software doesn’t recognize the digital keyboard and whatever they play on the piano is not heard / recorded in the recording software.
Before you can start using the various music software, you will need to be sure that your keyboard is connected properly to the computer.
If for any reason the connection check gives an error, ensure that the MIDI-In of the interface cable is connected to the MIDI-Out of the Yamaha keyboard and the MIDI-Out of the interface cable is connected to the MIDI-In of your Yamaha keyboard.
Another method is to use the “Connection Check” feature within the software which tests whether the connection is working properly.
Here are some videos to help you out.
Under the “Electronic Musical Instruments” section, you will find the Flash Memory and the System Drive locations of your Yamaha keyboard.
The System Drive shows the User Song locations (Song locations 103 to 107), whereas the Flash memory shows you everything that is stored on the Flash memory (Song locations 108 onwards) of your Yamaha keyboard. It also shows information like how much free space is available on your Flash memory.
Sites for Downloading MIDI Songs
You can download songs from various sites. One such popular place is the www.music.yamaha.com site from where you can download your favorite songs and store it on your computer.
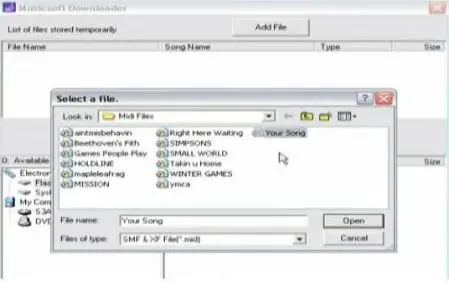
Once you launch the Yamaha Musicsoft Downloader application, you can access the memory locations of both your computer as well as your Yamaha Digital keyboard.
You can use the “Add File” button in the software to initiate the File transfer.
The Keyboards display will show the word “Com Mode” which means file transfer is in progress between the computer and the Yamaha music keyboard.
If you transferred the song from the computer to your Yamaha electronic keyboard, you can select the newly added song and play it as you would play any other song on your Yamaha midi keyboard.
Music Downloading Software
Now you know that you can take your user songs stored in the flash memory of your Yamaha and pack them on to your computer. You can download/transfer your favorite songs from your computer to your Yamaha midi keyboard.
But to be able to transfer the songs from your computer to the keyboard’s FLASH ROM, you will need to use Music software that will let you do such tasks.
“Yamaha Musicsoft Downloader” software is one such application, which usually comes bundled along when you buy your keyboard instrument.

KeytarHQ editorial team includes musicians who write and review products for pianists, keyboardists, guitarists & other musicians. KeytarHQ is the best online resource for information on keyboards, pianos, synths, keytars, guitars and music gear for musicians of all abilities, ages and interests.


Leave a Reply