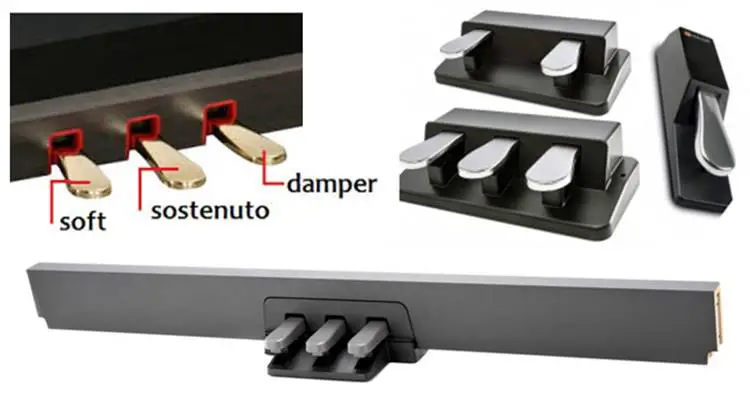
Sustain pedal on digital piano doesn’t work, produces opposite effect. All piano pedal-related problems are discussed here.
Sustain pedal on Digital Piano Doesn’t Work
Here are some commonly reported problems with sustain pedals.
- Sustain Pedal produces opposite effect.
- The pedals work sometimes and sometimes it doesn’t.
- The notes do not cut off when you take the hand off the keys. It is as though the sustaining pedal is on continuously. Sometimes this will happen and the next time it works correctly.
- The decay in the sound is much shorter than usual.
- More common problem is that the Damper pedal doesn’t work most of the time; occasionally it will sustain notes briefly. Over time, a pedal can wear out.
Sustain Pedal Produces Opposite Effect
This is a scenario that you may observe when trying to use a pedal with your keyboard instrument.
You use a sustain pedal with your brand new piano keyboard. You plug in the footswitch (or foot pedal) into the sustain jack and try to switch sustain on and off. The footswitch (for sustain) surprisingly seems to produce the opposite effect on your keyboard. For example, instead of sustaining the sound, pressing the footswitch cuts off the sound… and releasing it sustains the sounds. This is a totally opposite effect from what you require.
Possible Solutions
There is no need to get worried if the pedal is producing an opposite effect.
Your piano keyboard is absolutely okay. It’s just that the polarity of the footswitch is reversed. You may have accidentally pressed the footswitch while turning the power on. If you do so, the recognized polarity of the footswitch changes, resulting in reversed footswitch operation. Just turn-off the keyboard and disconnect the pedal. Make sure that the footswitch plug is properly connected to the SUSTAIN jack before turning on the power. Turn-on the keyboard and check again. The sustain pedal should work fine now.
Pedals being always in the sustain mode could be because of reverse polarity. Check if your sustain pedal has some sort of switch, and put it in the other direction, it should work fine. You may want to check the user manual to see how the polarity can be switched, if you are not sure.
For other problems, it could be because the contact points have dirt on them.
Most of the time, the problem is dirt. There is a simple electrical contact inside, and cleaning the contact surfaces could help as that is probably interfering with that contact.
In general, digital pianos have a circuit mechanism and the pedal controls the contact points to it. So, most probably, the problem is dirty contacts. When you press the pedal, the metal face connects the circuit which then performs the sustaining function.
The contacts are similar to the ones you find on most remote controls for televisions (little buttons on a rubber membrane).
So you may try opening it up and cleaning that area. If it is a lot dirty, then it is good because then you know it will work once cleaned. However, if that’s not the case, then you may have to buy another pedal.
You may try unplugging the unit, check jack connections, vacuum around pedals. Plug in and remove several times to see if there is a loose connection or twisted/broken wire. If the physical connection is loose the circuit will not get completed. If you open the pedal assembly, it could reveal that.
In most cases, cleaning vacuuming solves the problem. But if it happens most of the time, probably some connection is loose, which probably breaks the circuit when you press the damper.
In some cases, when the keyboard is switched on, it sustains by itself, even when the damper pedal is not depressed. In this case, try doing either a factory reset or when you switch on the piano, make sure you keep the pedal pressed. It should reverse the action.
With digital pianos, usually the pedal is either not registered or is registered in reverse if the power is on when you plug in the pedal. So you just need to turn-off your digital piano keyboard, plug in the pedal to the sustain jack and then switch-on the power. This solves the problem most of the time.
If you’re playing the piano after a very long gap, the Damper, Sustain, and Soft pedals may not work. Occasionally it works, but the very next moment it doesn’t work for the same keys. If you have moved recently, something may have been jarred during the move process, which may break something related to the pedal. And most don’t understand the internal wiring to fix it by themselves.
In some cases, a wire from the pedal gets ‘unplugged’ or broken. The problem with the pedal sometimes is that the wire at the back is not put in a right place.
In some cases, even after opening the pedals box, you may not notice anything wrong. Opening the cover of the piano to check connectors or if anything else looked wrong, but it may all seem very clean and nothing seemed to be unplugged. In that case, you may need professional help.
With sustain pedals on digital pianos, there are a couple of places where things could go wrong. The first is the physical connection itself. May be while moving the piano, connection between the pedals and the cable / cable stops would have become loose. These fixes are easy to diagnose and to fix. It could mean tightening up some screws, or if the cable is broken then probably replacing it. If the main board itself is not recognizing the Pedal presses then it becomes a bit tricky, since you have to trace if the signal for the “Pedal Press” is reaching the circuit board.
When trying to reset the program (to make it go back to normal) make sure to save all your file so you have a copy, again if it does not work you need to consult a technician or service centre because sometimes we need to check the inside of the unit to make sure or wire and contact is place. To do a reset you will need a service manual of your Digital Piano.
The problem could be in the main keyboard also but that seems to be less likely, however not completely ruled out if the cleaning of the contacts doesn’t work.
If you have multiple pedals, and if they look similar, you may try replacing one of the others and plugging in to see if that works.
You can even take this one step further and use an ohm meter, which checks for conductivity, to test the connection (in case you or any of your friends has it).
You can set the meter on ohms and see if the connection is completed (makes a circuit between the two contact surfaces at the end of the plug) when the pedal is pressed.
Check if your pedals working are inverted. While turning the keyboard off and back on, make sure you don’t press the pedal when the piano is turning on. If it still doesn’t work, you will need to see the connection for any broken connection, and probably get replacement parts. See for broken connection, if you are good at checking electrical problems. If that is not the case, try talking to support for help, and check if they offer any replacement parts or Sustain Pedal Repair Kit.
Replacement Parts for Pedals
Replacement Cable Lead for the Pedals
Ordering replacement cable lead from the pedals to the relevant socket or adjustable metal rod that goes from top of sustain pedal to bottom of keyboard.

While moving the piano, the pedal wire that clips into the underside of the keyboard was inadvertently broken. The edge of the plastic clip is broke and now the sustain pedal doesn’t work.


Trouble Shooting Contact Problems with Keys and Pedals on Digital Piano Keyboard
Living in a city with a high suspended particle matter (dust), humidity are ideal conditions for having contact problems between digital piano keys and pedals.
Removed the Keys and thoroughly cleaned the contacts on the PCB with IsoPropyl Alcohol and later used a Hair dryer to ensure there was no trapped moisture.
Note: Each Key Note has TWO points on the Touch Pad that make contact to the Keypad PCB. These two contact points on the Keypad are at different heights, on striking the key the higher of the two produces the sound, while the lower one suppresses the sound (something like that).
In this case, it was determined that it was the lower contact point which seemed to be the problem which attempted to be rectified by put the Carbon Dots Stickers on the Contact Points of the Touch Pad associated with the problem keys.
Also on this keyboard, I found that 12 keys were supported by one set of Touch Pads and there was 2 sets of Touch Pads on one PCB which was connected to the Main PCB via Ribbon cable (refer diagram).
Keyboard Layout
_A#___C#_D#____F#_G#_A#____C#_D#___F#_G#
A__B_C__D__E__F__G__A__B_C__D__E__F__G__A
<—–TouchPad1—–><—–TouchPad2—–>
<—————–KeyPadPCB1————->
I swapped the Touch pad2 with the Touch Pad1 and ended up with the same problem, thus concluding that there was NO issue with the Touch Pad which is the usual culprit in most cases.
The problem was now isolated to the underlying Keypad PCB, Ribbon Cable or Main PCB
On the Keypad PCB, did doing numerous continuity test using a Lighted Continuity tester for every key (two contacts to check), also checking the Diodes, unable to find a faulty connection / ground fault
As it so happens, problem is with a Set of 8 keys, thus all 8 keys must be connected to something common that is giving this problem.
Pulled out the Ribbon Cable and put it back after cleaning both ends to ensure there were no contact problems.
I am not a qualified Electronic Tech, so I called up a qualified engineer friend and he thought it could be an IC, more so a Capacitor on the Main Board that could control this entire set of 8 keys.
So finally the only solution is to call an Experienced Tech, if anybody knows if I could be wrong in my conclusion, please post your opinion so I and others can learn and understand too.
Now Problem 2 was solved with the addition of the Carbon Dot Stickers……..phew it was a busy day
I was assisting an Electrician during this operation as he has solved Contact Issues with my Piano before with my guidance.
I feel compelled to write this as I also did get help from the net in understanding few things.
One more thing, if you have a problem with a sticky Damper pedal, one will need to open the Pedal housing and identify the switches for height and how many pins. Remove the old pins with Solder Iron and solder the new Switch and you’re done, this don’t need a keyboard tech who will definitely charge more in comparison with a handy man / electrician.
If you only use the Sustain Pedal, then remove the switch from least used other pedals and solder it on to the Sustain Pedal and later source the replacement.
KeytarHQ editorial team includes musicians who write and review products for pianists, keyboardists, guitarists & other musicians. KeytarHQ is the best online resource for information on keyboards, pianos, synths, keytars, guitars and music gear for musicians of all abilities, ages and interests.


Leave a Reply